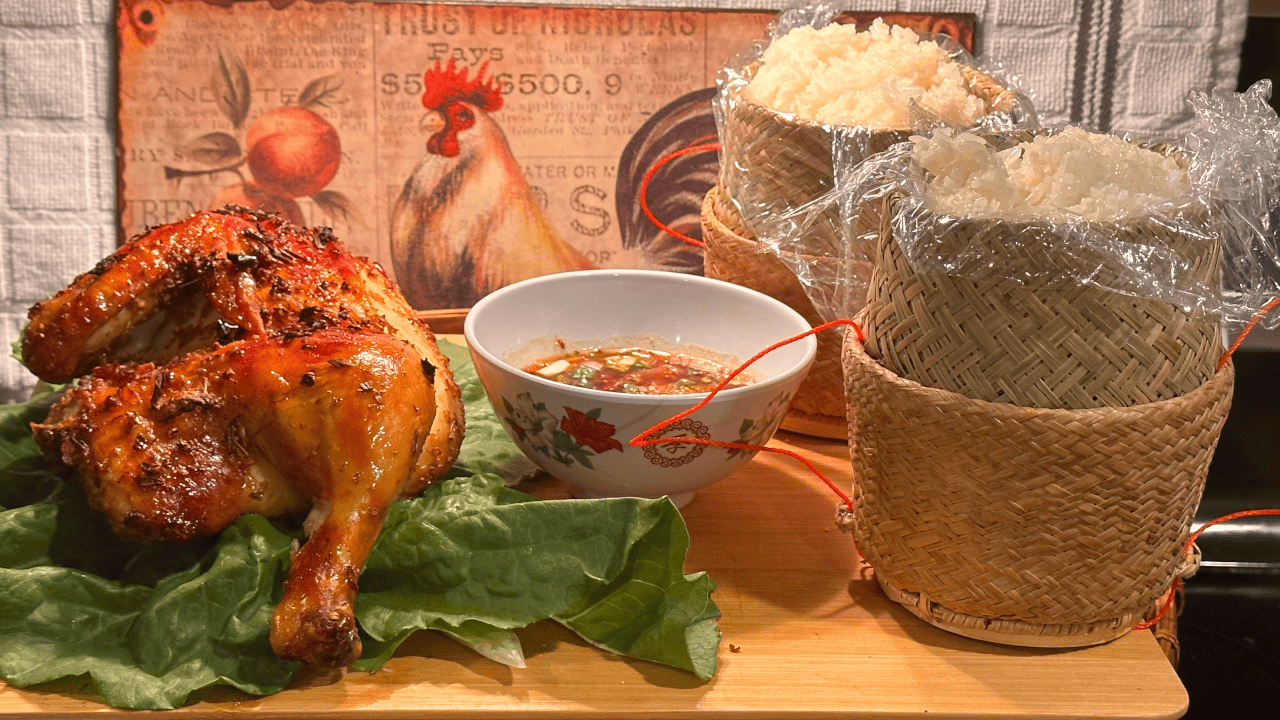
I’ve been wanting to do this recipe since the beginning of doing this cooking show, but I, for whatever reason, waited until now to make it. Thai Roasted Chicken and Sticky Rice, or ข้าวเหนียวไก่อบ, is one of my favorite dishes from my childhood, and it’s something that I would get every time I went to visit family in Thailand. And whenever I was craving it while stateside, we would usually make our own sticky rice and then buy the Costco rotisserie chicken as a quick and easy substitute for the Thai roasted chicken. Obviously, it wasn’t flavored exactly the same, but it definitely was a lot easier to buy a whole cooked chicken than to make it at home. But since I don’t have a rotisserie, I thought for this recipe, I would try to replicate the traditional Thai recipe. And I think this combination of ingredients did a great job at copying the flavors I remember from my childhood spending time in my family’s home region of Issan.
Though, usually you’ll find this dish in Thailand more commonly as ข้าวเหนียวไก่ย่าง, or Grilled Chicken and Sticky Rice, since it’s a lot easier to have a grill in your street cart rather than a whole oven, and since it’s a lot easier to cook a whole bunch of chicken on the grill rather than waiting for them in the oven.
I definitely recommend grilling your chicken if you are able to, since it gives the chicken a nice smoky flavor and it firms up the meat a bit more, making it easier to eat with your hands, which is the preferred way of eating this dish. But, if you don’t really feel like going to the effort of grilling or if you don’t have a grill, roasting the chicken is still plenty delicious since you’re using the same ingredients.
Speaking of ingredients, if you want to add a bit of green to the dish, this dish is typically served alongside some lettuce or other greens, so I definitely recommend adding this to round out the dish. Also, I recommend playing around with the amounts of ingredients for the marinade and dipping sauce to adjust them to your liking. For example, I definitely misread what I wrote down for the amount of coriander and I used tablespoons rather than teaspoons. But, I actually didn’t mind the extra coriander flavor, and I might not add quite as much as I did this time, but I might try to add a little extra next time I make this.
But if you can’t find certain ingredients to make either the marinade or the dipping sauce, I wouldn’t worry too much about it. You can still make a very delicious recipe without the harder-to-find ingredients, but it just obviously won’t taste as authentic as it would be, since many of these ingredients, such as the coriander, lemon grass, and tamarind paste, are the key flavors of this dish.
One other really interesting key flavor of this dish is the toasted rice in the nam jim jaew น้ำจิ้มแจ่ว dipping sauce. This sauce is very แซ่บ Sæ̀b, or yummy, in northeastern Thai dialect. It’s a combination of salty, sweet, sour, spicy, umami yumminess that is distinctly northeastern Thai in flavor. And a key part of this flavor is the secret ingredient of toasted rice powder that’s used in many Issan or northeastern Thai dishes, such as this one. This ingredient adds a nice nuttiness to balance with the acidity of the tamarind and lime, as well as providing some texture and acting as a thickening agent to help the sauce cling to the meat. This deceptively simple ingredient is the secret to making the most authentic Issan dishes, so definitely don’t skip out on this one.
The other star of this dish, the sticky rice, is also a somewhat hard ingredient to find since you need to use sweet or glutinous rice to make sticky rice. This is not the same type of rice as jasmine rice or sushi rice and it can be a bit tricky to find at the normal grocery stores. Of course, you could instead serve this dish with normal white rice if you can’t find the correct type of rice, but again it won’t be as authentic, though it will still be very delicious with the chicken. But, for any of these ingredients, if you can’t find them at your local grocery store, I recommend checking your nearest Asian grocery store and they should most likely have everything in stock.
But, regardless if you make this recipe with all of the authentic ingredients or if you take the shortcut of buying the premade Costco rotisserie chicken, you will have a flavorful, filling meal that you will be able to enjoy with your whole family, and hopefully, you will find this to be a recipe you come back to again and again.
Ingredients:
- 5lb or so Chicken (you can use whatever cut you like, but I like making this with a whole chicken so that you get a mix of all of the different types of meat)
- Thai marinade:
- 2 tsp or so white peppercorn
- 2 tsp or so coriander seeds
- 1 stalk lemongrass
- 6 cloves garlic
- 1/2 lime’s worth of juice
- 2-3 red chili (optional)
- 3 tbsp or so soy sauce
- 3 tbsp or so fish sauce
- 1 tbsp or so Dark soy sauce
- 1/2 cup or so Chinese cooking wine/water
- 2 tbsp or so oil
- 1 tbsp or so brown or palm sugar
- Nam Jim Jaew dipping sauce (optional):
- 2 tbsp or so tamarind paste
- 1 tbsp or so fish sauce
- 1 tbsp or so brown or palm sugar
- 1/2 lime’s worth of juice
- Some dried chili flakes
- 1 shallot
- 1 green onion
- 2-3 sprigs cilantro
- 1 tbsp or so uncooked rice
- Sticky rice (in rice cooker):
- 3 cups sweet or glutinous rice
- 3 cups water
- Pinch of salt, if desired
Special Equipment:
- A mortar and pestle or some sort of grinder to prepare some of the ingredients for the marinade and dipping sauce
- A rice cooker to cook the rice (technically optional, but… just get a rice cooker 😑)
Step 1: Break Down Chicken into Smaller Pieces to Make it Easier to Work With (If needed)
First, we’ll prepare the chicken, so if you need to break it down, I like to start by trimming off any excess skin.
And then, I like to spatchcock it by first finding and cutting out the backbone, which can be a bit tricky to cut out at first, but as long as your scissors are sharp enough, you should be able to cut around the hip and then through the thin rib bones.
Once you remove the spine, you can save it for later in the fridge or freezer to make a broth. You can cook the chicken as is, but because this chicken is quite large, I like to cut it in half completely to make it easier to work with. So, flip the chicken breast-side down on the cutting board and find the center of the breastbone. And then using a sharp knife, crack and then cut completely through the center of the breastbone and the rest of the chicken to evenly divide it in two.
You of course are welcome to break down the chicken even further into individual sections, but I think this is good enough.
Step 2: Prepare Thai Marinade & Marinate Chicken for 3-4 Hours to Overnight
Once your chicken is broken down to your liking, we’ll prepare the marinade, so in a mortar, spice blender, or food processor, add in your white peppercorn and coriander seeds and grind this until it turns into a coarse powder, if needed.
Then, slice up the bottom half of your lemongrass into thin slices and then add this to your mortar, or other cooking implement, along with your garlic cloves and give this a grinding as well, until it turns into a paste.
Then, once it’s ready, transfer this to a mixing bowl and add in the red chilis chopped up, lime juice, soy sauce, fish sauce, dark soy sauce, chinese cooking wine, oil, and brown sugar and then give this a mix to dissolve the brown sugar and to combine everything together.
Then, once that’s done, to a ziptop bag, add in your chicken pieces and then cover this with your marinade and then place this in a bowl to keep things from spilling and let this marinate for at least 3 hours or overnight.
Step 3: Make Sticky Rice by Soaking Rice for 30 Minutes-4 Hours & Then Cooking Rice as Usual
And since we need to wait anyways, we can also prepare the sticky rice now as well. So, traditionally, sticky rice is cooked by soaking it in water for 3-4 hours and then steaming it in a bamboo basket. But, since most people wouldn’t have this special equipment, I’ll be showing how to make it using a rice cooker.
So, first, rinse the rice a couple of times until the water is somewhat clear but still a little cloudy.
Then, add your rice to the rice cooker bowl and add in your water. I recommend a 1:1 ratio, but your rice cooker might differ slightly so try different ratios if you want your sticky rice to be more or less clumpy.
Then, let this soak in your unplugged rice cooker for 30 minutes up to 3-4 hours to allow the rice to soak up the water, making it softer and stickier.
Then, when you’re ready to cook it, give it a stir, and sprinkle in some salt if desired. Make sure you flatten the rice so that all of it is covered in the water, and then cook it how you normally would cook other rice in your rice cooker.
Then, once it’s done, let it rest on warm for at least 5-10 minutes before you open the cooker to let the steam finish cooking the rice and then you can fluff the rice up and let it rest in the rice cooker until you’re ready to use it.
Step 4: Cook Chicken on Medium-Heat Grill or Bake Chicken at 400°F for 30-40 Minutes (Or Until 165°F)
When you’re ready to cook your chicken, if you have a grill, I recommend grilling it on medium to medium low heat for about 20 to 40 minutes depending on the size of your chicken, flipping every 5 minutes or so, until the internal temp is about 165°F.
But, for those without a grill, I’ll be showing how to make this in the oven. So, preheat your oven to 400°F and pull your chicken from the fridge to help it warm up a little while we wait for the oven.
Then, once your oven is ready, place your chicken, skin side up, on a baking rack over a baking sheet covered with aluminum foil and then place this on the middle oven rack and bake this for 30-40 minutes or until the internal temp is about 165°F.
About halfway through, once the skin has dried, you can brush it with some oil to make it extra crispy, but this is optional.
Step 5: Prepare Ingredients for & Mix Together Nam Jim Jaew Dipping Sauce
While we wait for the chicken to finish cooking, if you want to make the dipping sauce, first, in a small pan, add in some uncooked rice and toast this for a few minutes or until the rice becomes browned and has a nutty aroma to it.
Then, in a mortar, or other implement, grind this into a powder and set this aside for later. Then, for your shallot, green onion, and cilantro, chop these into small pieces.
In a mixing bowl, add in your tamarind paste, fish sauce, brown sugar, lime juice, dried chili flakes, and shallot and give this a mix until everything is well combined.
Then, a little before you want to serve the dish, add in the green onion, cilantro, and toasted rice powder. You will want to wait to add these, since these ingredients will wilt and get too soggy after sitting in the sauce for a while. It’s not that important, but if you want the fresh taste from these ingredients, I would wait until you’re about to serve your chicken.
And with that, your nam jim jaew dipping sauce is ready to use.
Step 6: Once Everything is Fully Cooked, Serve & Enjoy!
Once your chicken and sticky rice are done, serve the chicken on a serving plate with your sticky rice and dipping sauce portioned out, and with that, your Thai Roasted Chicken and Sticky Rice is ready to eat.